Crafting a Floating Bubble in Android with Jetpack Compose

Jetpack Compose simplifies UI development with a declarative approach, improves productivity with live preview, and offers a modern, reactive framework for building dynamic and interactive user interfaces. In simple words, it makes it fast, easy, less error-prone, and funny to do complex UIs.
At Blueground, we needed to create an in-app bubble that will be visible whenever the user minimized the chat screen. This bubble will be visible on every screen of the app and the user could drag it wherever he wants.

In essence, we had to implement an in-app-only, permissionless bubble. Jetpack Compose lets us implement this UI element fast and easily. In this blog post, we will describe how we implemented this.
Scaffold the bubble
For this UI element, we need to define two things, the area in which we can drag our bubble and the bubble itself. So the skeleton of our implementation will look like that:
@Composable
fun FloatingDraggableItem(
    content: @Composable BoxScope.() -> Unit,
) {
	Box(
        modifier = Modifier.fillMaxSize(),
    ) {
        Box { content() }
    }

}
The outer Box defines the area in which we can drag our bubble and the inner Box wraps the bubble. Basically, the inner Box is the one that will be dragged and as a result, the bubble will be dragged too. With the help of slot APIs we can use any composable as a bubble. Another benefit of wrapping the content is that it helps us to perform calculations based on content size.
Next, we need to define the state of the composable. More specifically, we needed to track the bubble's position, the bubble's size, and the container's size. The last two are useful for calculating the area in which is permitted to drag our bubble. We do not want our bubble to be placed out of our screen 😔. The state will look like that:
data class FloatingDraggableItemState(
    val contentSize: IntSize = IntSize(width = 0, height = 0),
    val containerSize: IntSize = IntSize(width = 0, height = 0),
    val offset: IntOffset = IntOffset(x = 0, y = 0),
) {

    val dragAreaSize: IntSize
        get() = IntSize(
            width = containerSize.width - contentSize.width,
            height = containerSize.height - contentSize.height,
        )
}
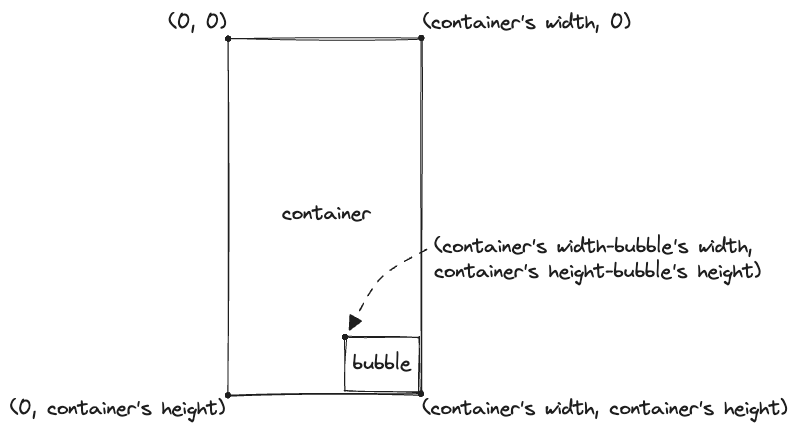
In Android, views/composables are placed on the screen using x and y coordinates. The top-left corner of the screen is considered the origin (0,0) point. Every view/composable is placed within this coordinate system based on its top left pixel. This means that the effective drag area should have a width equal to the container's width minus the bubble's width and a height equal to the container's height minus the bubble's height.
After defining the state we need to update its values whenever the composables changed size. To achieve that we used the onGloballyPositioned modifier function. onGloballyPositioned is a callback that gives us the size and position of a component on the screen. This is useful for positioning and adjusting other elements.
@Composable
fun FloatingDraggableItem(
    content: @Composable BoxScope.() -> Unit,
) {
    val state = remember { mutableStateOf(FloatingDraggableItemState()) }

    Box(
        modifier = Modifier
            .fillMaxSize()
            .onGloballyPositioned { state.value.containerSize = it.size },
    ) {
        Box(
        modifier = Modifier
            .onGloballyPositioned { state.value.contentSize = it.size },
        ) { content() }
    }

}
Make the bubble float!
After scaffolding our bubble we can proceed to the funny part a.k.a dragging the bubble! For doing so, we need to use the pointerInput modifier function which helps us to process touch, drag, and gesture events within the region of the modified element. We are interested only in dragging, so we use the detectDragGestures function inside the PointerInputScope. The detectDragGestures inform us about the drag amount in order to update the bubble's offset. The drag amount is the delta between the current and the previous position, so we need to add it to the current offset to place the bubble correctly. Our draggable bubble will look like that:
Box(
modifier = Modifier
    .offset { state.value.offset }
    .onGloballyPositioned { state.value.contentSize = it.size }
    .pointerInput(Unit) {
        detectDragGestures { _, dragAmount ->
            val calculatedX = state.value.offset.x + dragAmount.x.roundToInt()
            val calculatedY = state.value.offset.y + dragAmount.y.roundToInt()
            state.value.offset = IntOffset(calculatedX, calculatedY)
        }
    }
) { content() }
With all this code we calculate where to place our bubble based on the drag amount, but the actual drag does not happen yet. We need to use the offset modifier function which is used to specify the desired position of a composable by applying a translation to its original position. When state.value.offset is updated in the detectDragGestures, recomposition will be triggered and the offset modifier function will use the new value. As a result, the bubble will be dragged!
Box(
modifier = Modifier
    .offset { state.value.offset }
    .onGloballyPositioned { state.value.contentSize = it.size }
    .pointerInput(Unit) {
        detectDragGestures { _, dragAmount ->
            val calculatedX = state.value.offset.x + dragAmount.x.roundToInt()
            val calculatedY = state.value.offset.y + dragAmount.y.roundToInt()
            state.value.offset = IntOffset(calculatedX, calculatedY)
        }
    }
) { content() }
The only thing that we miss right now, is to restrict dragging inside the container. To ensure that always we will place our bubble inside our container we need to use the dragAreaSize that we calculate in the FloatingDraggableItemState. More specifically we want to ensure that the offset is between 0 and the calculated size. That's why we are going to use the coerceIn function. The coerceIn is a function in Kotlin that ensures a value stays within a specific range. If a value is outside the range, it is adjusted to the closest boundary value. The code will look like that:
.pointerInput(Unit) {
    detectDragGestures { _, dragAmount ->
        val calculatedX = state.value.offset.x + dragAmount.x.roundToInt()
        val calculatedY = state.value.offset.y + dragAmount.y.roundToInt()

        val offset = IntOffset(
            calculatedX.coerceIn(0, state.value.dragAreaSize.width),
            calculatedY.coerceIn(0, state.value.dragAreaSize.height),
        )

        state.value.offset = offset
    }
}
In this blog post, we demonstrated how easy and fast it is to implement a floating bubble with Jetpack Compose. Some of the described techniques can be applied to your Android and iOS (🧌) Composables. You can check the implementation here which contains some more candies (animations on change bubble's visibility 😎).
Special thanks to my colleague Vasilis Charalampakis for his feedback and ideas in implementing this component!